Orange Protein/Energy Smoothie
Submitted by Steph Knapek
Ingredients:
8-10 large ice cubes
1 scoop vanilla protein powder
1/2 scoop Orange Amino Energy
4 oranges, peeled and sliced
1 cup skim milk
Directions:
Place ice, protein powder, Amino Energy and oranges in blender. Run blender on crush ice mode for 20-30 seconds. Add milk and blend on smoothie mode for 30 seconds. Serve and drink immediately. Makes enough for 2- 16oz. servings.
400 Calorie Orange Creamsicle Smoothie
Submitted by Marlene Miller
Cottage cheese makes this smoothie extra thick and creamy and adds a healthy dose of the protein casein. Casein is a slower digesting protein that will continue to feed your muscles hours after your last sip.
Ingredients:
1 scoop vanilla protein powder
1 orange
1/4 orange peel
2 Tbsp Walnuts
2 Tbsp flaxseed meal
1 cup cottage cheese
1.5 cups water
3 ice cubes
Directions:
Combine all ingredients in a blender and blend until smooth. For a thicker shake add less water or more ice cubes.
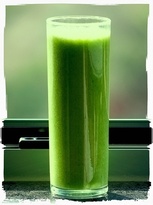
Energy Smoothie
Ingredients:
Two handfuls baby spinach
1 apple
1 banana
1 cup of yogurt
5 strawberries
1/2 orange
Directions:
Put all ingredients in a blender and blend well.
Two handfuls baby spinach
1 apple
1 banana
1 cup of yogurt
5 strawberries
1/2 orange
Directions:
Put all ingredients in a blender and blend well.
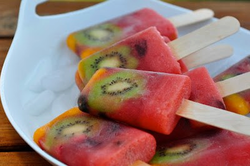
Healthy Popsicles
Submitted by Meghan Sullivan
Ingredients:
3 cups watermelon puree (seedless if possible)
1/2 cup fresh blueberries
1/2 cup chopped fresh strawberries
1 kiwi, peeled and sliced
1 peach or nectarine, diced small
Handful fresh cherries, pitted and chopped
Directions:
Cut the watermelon into chunks and then puree it in a blender until smooth. Set aside. Set out about 1 dozen popsicle molds (amount needed will vary depending on size of molds). Fill each one with the chopped fresh fruit. Then pour in the watermelon puree until each mold is full to the top. Place a popsicle stick into each one. Place into your freezer and freeze for about 6 to 8 hours. When ready to serve, run the popsicle molds under warm water for a few seconds and then pull each one out.
Chocolate Almond Butter Bites
Submitted by Jake Lewis
Ingredients:
4 tbsp coconut oil
4 tbsp unsweetened cocoa powder
1 pack Splenda or 2-3 drops liquid Stevia – optional, sweeten to taste
2 tbsp nut butter – creamy or crunchy works fine
Sea salt – optional
Directions:
Step 1: Melt oil. In a small microwave safe bowl melt the coconut oil until liquid in form, but not too hot.
Step 2: Add cocoa powder and sweetener. Stir in the cocoa powder and as much sweetener as you’d like until the cocoa is mixed well and there are no longer chunks of cocoa powder.
Step 3: Pour into ice cube forms. Using a small spoon pour the chocolate into each ice cube form filling them about 1/3 of the way up. The rubber ice cube trays are ideal for this recipe as they will be much easier to remove from the trays verses the traditional plastic trays. I found cute ones at the craft store that come in different shapes like hearts, flowers and stars.
Step 4: Freeze. Place the tray in the freezer for 3-5 minutes or until the chocolate has set. The longer they are allowed to cool the better they turn out.
Step 5: Add nut butter. With a small spoon place a small layer of the nut butter on top of the set chocolate, pressing it down with your finger. It’s a little messy but well worth the effort.
Step 6: Freeze. Place the ice cube trays back in the freezer for another 5 minutes. The nut butter takes longer to set but if you’re in a hurry it’s okay to take them out before they are completely frozen.
Step 7: Top with chocolate. With a small spoon carefully fill the ice cube forms with the remaining chocolate mixture. If you drip chocolate all over the ice cube tray simply take a damp paper towel and wipe around the edges until it’ clean. *Optional – add a few sprinkles of sea salt on top for a sweet, salty addition.
Step 8: Freeze. Place the ice cube trays back in the freezer for at least another 5 minutes or until you are ready to eat them. These are best kept in the freezer, or fridge until they are ready to be gobbled up.
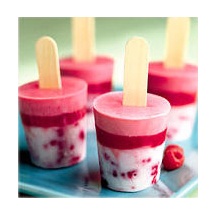
Frozen Yogurt Pops
Ingredients:
Yogurt, any brand or flavor [except whipped]
Small paper cups
Popsicle sticks
Tin foil
Directions:
Fill cups to the top with yogurt OR to make parfaits, alternate flavors...a few spoonfuls of vanilla, then a few spoonfuls of banana, etc. Place a piece of tin foil over the cup and cut a slit in the center with the tip of a sharp knife. Slide the popsicle stick through the slit in the foil and half way into the cup of yogurt. Place into the freezer for at least 4 hours. Overnight is best. Remove the foil and peel away the paper cup.
